HOW Do We Help You Obtain the Massive Benefits of Mass Customization?
To ensure high quality and efficiency in every project we engage in, we have developed a well structured 7- step process inspired by expert researchers within the field of mass-customization.

During the analysis we apply structured and well researched methods and tools from multiple different disciplines, such as LEAN, mass customization, and general complexity management. Below is a short introduction to the methods and tools applied along the 7 step process, which serves as a solid framework for analyzing, implementing and preserving CPQ systems. If you
Step 1: Scoping
Firstly, we offer help scoping out a Configuring, Pricing & Quoting (CPQ) project in a structured manner, to ensure that all relevant stakeholders are well aware of the objectives, available tools and resources as well as the boundaries of the project.
Lean Methodology Process Mapping
Within this step, we start out by mapping the current process of configuring products, computing product costs, pricing and quoting. We identify the value-adding tasks, the necessary non-value adding tasks, and the unnecessary non-value adding tasks.
Gap Analysis Based on Highly Relevant KPI’s
Having mapped the current process (AS-IS), we now identify a set of highly informative and relevant “Key Performance Indices” (KPI’s) in close collaboration with you. We then measure the performance of the AS-IS process according to these KPI’s. Furthermore, the current AS-IS state, is documented in a gap-analysis, where it is compared to goals related to the same KPI’s for a desired future state (TO-BE).
At a later point when a project has been finalized, the new AS-IS state can then be mapped and compared to the original state, but also to the objectives set when initializing the project. In other words the gap-analysis will provide answers to the following two questions:
How much have we improved compared to the starting point?
Did we meet our expectations and objectives?
ABC-Analysis
Having the processes and objectives in order, we now strive to delimit the product side of the project. This is achieved using an ABC-analysis where products or product families are ranked according to the frequency of sales for that particular product or product type on one axis, and the profit made on the product on the other axis.
Thus a product that is frequently sold, and generating high profit is scored as an AA-product, and oppositely a product that is rarely sold and have low or even negative profit margins will be scored as a CC-product.
It is worth noting, that in the majority of cases, products follow the Pareto principle, meaning that 20% of the products, generate 80% of the revenue!
The analysis is used to help prioritize the products in terms of embedding them into CPQ solutions.
Step 2: Product Variant Master
Having scoped and delimited the CPQ project regarding both processes and products, we now create a visual communication tool that will communicate the configured product(s) to all stakeholders, in a simple way so that it is fully understandable whether one has a technical background or not.
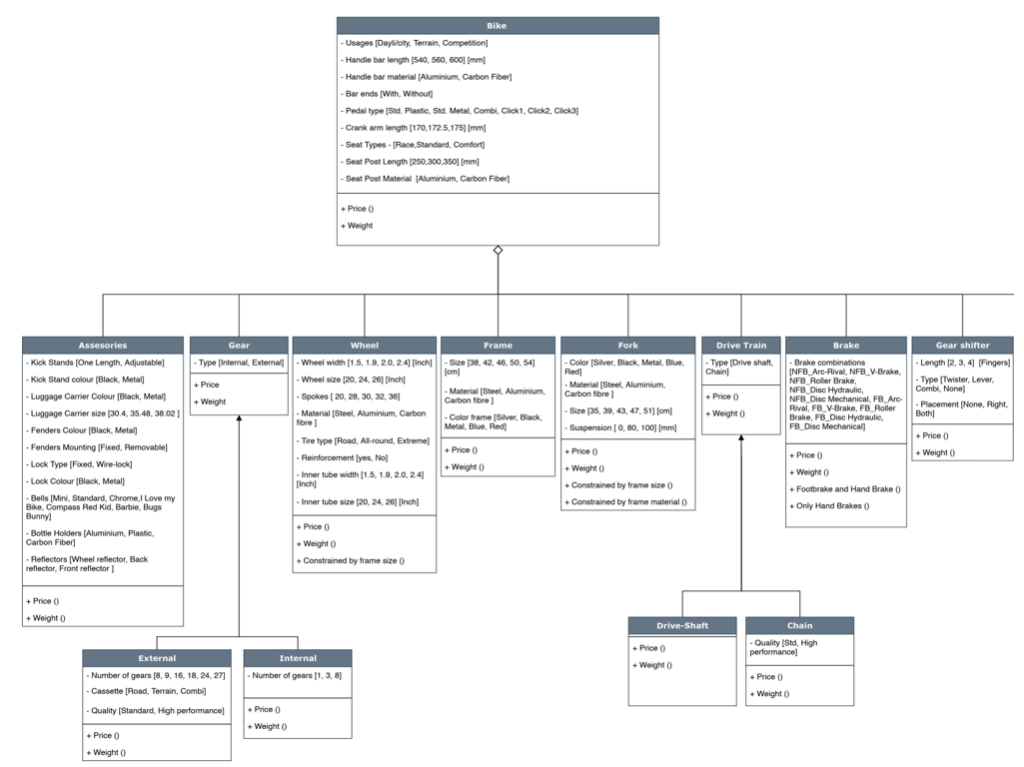
This is done with a Product Variant Master (PVM), that will quickly visualize and explain what the products consist of. The PVM looks similar to a tree, that “branches” the product down, so that it is broken down to all of it’s components and the relation between them.
The PVM is divided into the three following “point of views”; customer view, engineering view, and production view.
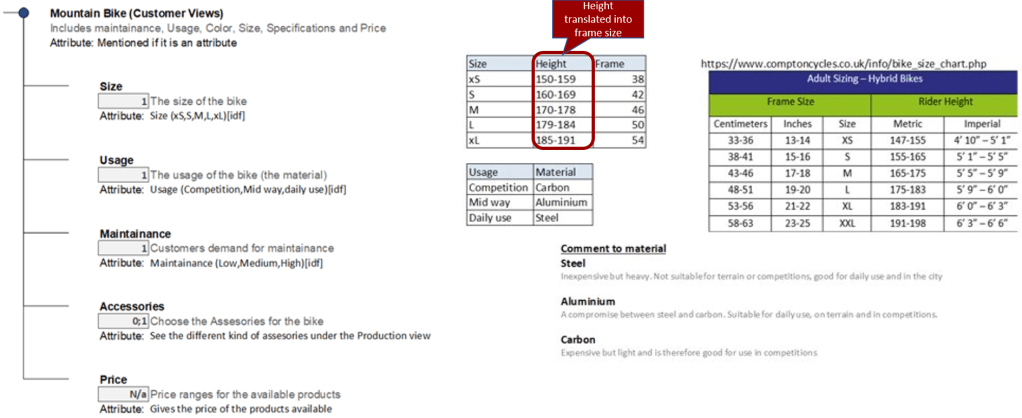
Customer view
The customer view is what the customer sees or/and will have to give input for the configuration. For the example of the bike, it could be to state their height which would then automatically be translated into a specific size of the frame by the configurator.
Engineering view
The engineering view further divides the branches of the PVM into two categories, “part-of”, and “kind-of” structure.
A simple example, would be a bicycle as the overall product. A brake is then “part-of” the bike, whereas you can have several “kind(s)-of” brakes, for instance handbrake and/or footbrake, as illustrated below:
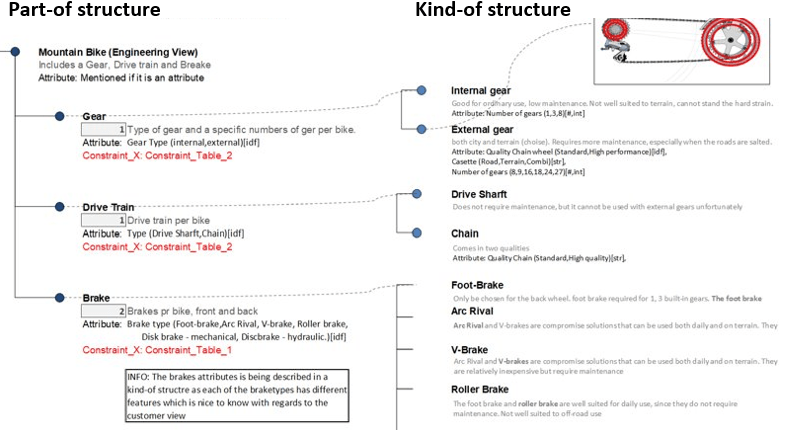
In this view the design engineering is the main focus, ensuring that only valid combinations of components and sub-components can be combined so that no interdependent constraints or rules are violated.
Production view
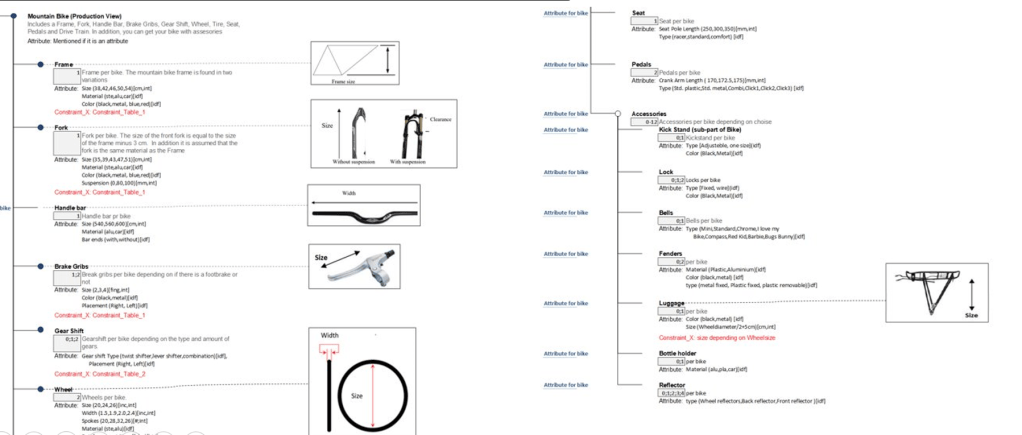
The third view of the PVM is called the production view, and refers to how the product is to be assembled. For the example of the bike this would mean that all of the overall types of components that makes up a bike must be listed and visulized within this view, see illustration below:
Step 3: Object Oriented Modelling
Now “Object Oriented Modelling” (OOM) is applied to translate the products into a “common language”. The aim of this is that skillful programmers or configuration engineers can build the configurator for the product(s) without knowing anything about the product on beforehand. She doesn’t even have to know what the product is used for or who it is sold to, but can build a high performance customized CPQ solutions, within a short timeframe.
For our OOM we use the notion of the “Unified Modelling Language” (UML).